Personal view for a Power Apps gallery
Sep 10, 2024 • 5 • 948
Table of contents
In SharePoint lists, we’re familiar to creating both shared views for all users and personal views tailored to individual preferences. As you develop Power Apps, you might frequently ask, “Can I create a custom view just for me?” Users often need different information displayed in their views. This blog explains how you can accomplish this in Power Apps!
End result
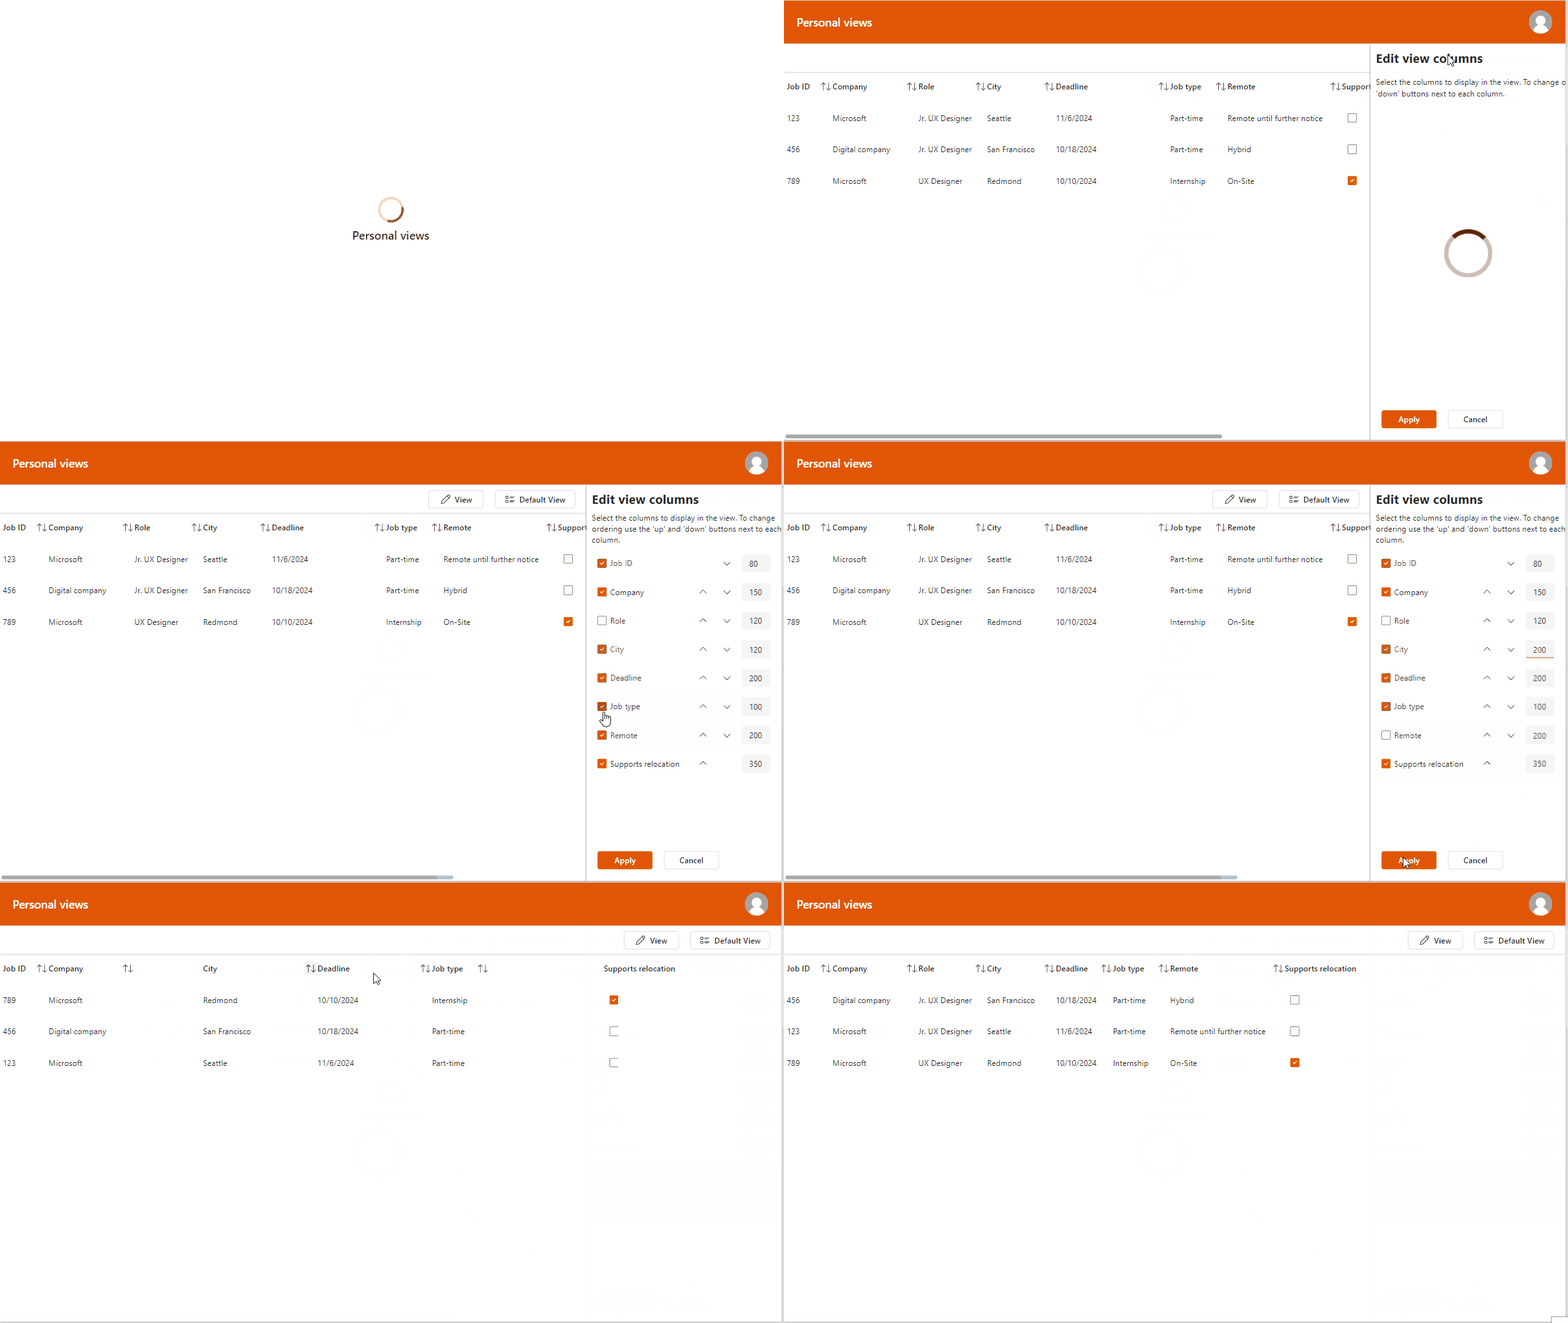
The end result is a gallery including a header for which users can create their own view or use the default view.
Setup
In this scenario the data is stored in SharePoint. Two lists are available:
- Job Application Tracker
- Personal views
The first list contains the data that needs to be displayed:
![]()
The second lists stores the information for the personal view per user:

Basic info
The app uses different collection, to understand the solution hereby the names and purpose per collection.
| Name | Purpose |
|---|---|
| colDefaultView | This collection is needed to store the information for the default view. When the users doesn’t have a personal view, this view is used |
| colPersonalView | This collection is needed to store the information of the personal view, this data is stored in SharePoint column in JSON format |
| colDisplayView | This collection is needed to store the information which is used to display. Filled with information of the default view or the personal view. |
| colEditView | This collection is needed to store the information while editing the personal view. This collection is used so the user can also cancel the editing and go back to the previous saved view. |
On the Loading screen a timer is set in which:
- the data of the Job Application Tracker list is stored into a collection.
- the information of the default view is set.
- checks if there is a personal view available for the logged in user.
//Load data into collection
Clear(colJobApplicationTracker);

ForAll('Job application tracker',
    Collect(colJobApplicationTracker,
    {
        JobID: ThisRecord.Title,
        Company:ThisRecord.Company,
        Role: ThisRecord.Role.Value,
        City: ThisRecord.City.Value,
        Deadline: ThisRecord.Deadline,
        JobType: ThisRecord.'Job type'.Value,
        Remote: ThisRecord.'Remote?'.Value,
        Supportsrelocation: ThisRecord.'Supports relocation?'
    }
    )
);

//Set settings for default view
ClearCollect(
    colDefaultView,
    [
        {ColumnID: 1, ColumnName: "JobID", Name: "Job ID", Visible: true, Width: 80, Sortable: true, Order:1},
        {ColumnID: 2, ColumnName: "Company", Name: "Company", Visible: true, Width: 150, Sortable: true, Order:2},
        {ColumnID: 3, ColumnName: "Role", Name: "Role", Visible: true, Width: 120, Sortable: true, Order:3},
        {ColumnID: 4, ColumnName: "City", Name: "City", Visible: true, Width: 120, Sortable: true, Order:4},
        {ColumnID: 5, ColumnName: "Deadline", Name: "Deadline", Visible: true, Width: 100, Sortable: true, Order:5},
        {ColumnID: 6, ColumnName: "JobType", Name: "Job type", Visible: true, Width: 100, Sortable: true, Order:6},
        {ColumnID: 7, ColumnName: "Remote", Name: "Remote", Visible: true, Width: 200, Sortable: true, Order:7},
        {ColumnID: 9, ColumnName: "Supportsrelocation", Name: "Supports relocation", Visible: true, Width: 150, Sortable: true, Order:8}

    ]
);

Clear(colPersonalView);
ForAll(ParseJSON(LookUp('Personal views', Title = User().Email).Viewsettings),
Collect(colPersonalView,
{
        ColumnID: Value(ThisRecord.ColumnID),
        ColumnName: Text(ThisRecord.ColumnName),
        Name: Text(ThisRecord.Name),
        Visible: Boolean(ThisRecord.Visible),
        Width: Value(ThisRecord.Width),
        Sortable: Boolean(ThisRecord.Sortable),
        Order:Value(ThisRecord.Order)
})
);

Clear(colDisplayView);

If(CountRows(colPersonalView) = 0,
    Collect(colDisplayView, colDefaultView),
    Collect(colDisplayView, colPersonalView)
);

Navigate('Personal View Screen');
Main Screen
The structure of the Screen:
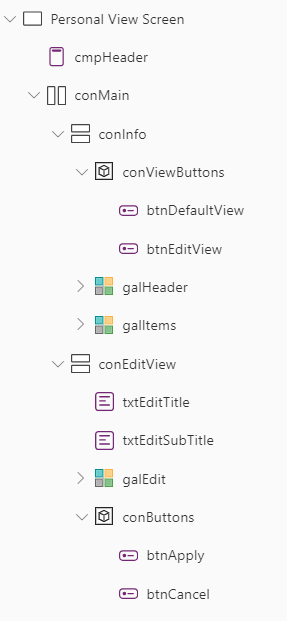
On the container (conInfo) the FillPortions is set: If(varvisibleEditView, 3, 1).
Header Gallery
On the Gallery for the Header for every column there is a text and a button element.:
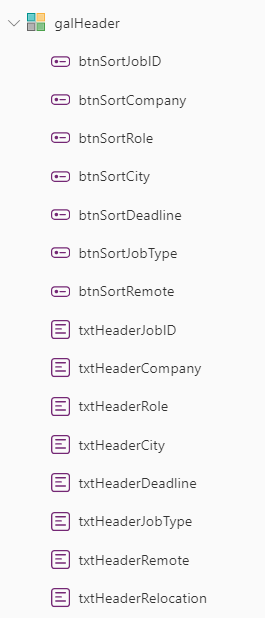
The properties set on Gallery level:
| Property | Value |
|---|---|
| Items | First(colDisplayView) |
| LayoutMinWidth | Sum(Filter(colDisplayView, Visible = true), Width) |
The properties for the text elements:
| Property | Value |
|---|---|
| Text | LookUp(colDisplayView, Name = “Job ID”).Name |
| Visible | LookUp(colDisplayView, Name = “Job ID”).Visible |
| Width | LookUp(colDisplayView, Name = “Job ID”).Width |
| X | Sum(Filter(colDisplayView, Order < LookUp(colDisplayView, Name = “Job ID”).Order), Width) |
The properties for the button for sorting:
| Property | Value |
|---|---|
| Visible | If(LookUp(colDisplayView, Name = “Job ID”).Visible, LookUp(colDisplayView, Name = “Job ID”).Sortable) |
| X | txtHeaderJobID.X + txtHeaderJobID.Width - Self.Width |
| OnSelect | UpdateContext({SortColumn: LookUp(colDisplayView, Name = “Job ID”).ColumnName}); UpdateContext({CustomSortOrder: !CustomSortOrder}); |
Item Gallery
The gallery for the items for every column there is text element.
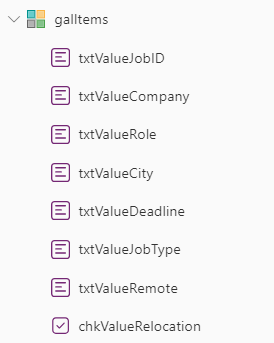
The properties set on Gallery level:
| Property | Value |
|---|---|
| Items | SortByColumns(colJobApplicationTracker,SortColumn, If(CustomSortOrder, SortOrder.Ascending, SortOrder.Descending)) |
| Width | Sum(Filter(colDisplayView, Visible = true), Width) |
The properties for the text elements:
| Property | Value |
|---|---|
| Text | ThisItem.JobID |
| Visible | LookUp(colDisplayView, Name = “Job ID”).Visible |
| Width | LookUp(colDisplayView, Name = “Job ID”).Width |
| X | Sum(Filter(colDisplayView, Order < LookUp(colDisplayView, Name = “Job ID”).Order), Width) |
Edit View
The OnSelect of the button View sets the visibility of the container for editing purposes and the collection for the personal view is stored into a collection, if already available for the current user.
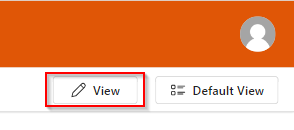
UpdateContext({varvisibleEditView: true });

Clear(colPersonalView);
ForAll(ParseJSON(LookUp('Personal views', Title = User().Email).Viewsettings),
Collect(colPersonalView,
{
        ColumnID: Value(ThisRecord.ColumnID),
        ColumnName: Text(ThisRecord.ColumnName),
        Name: Text(ThisRecord.Name),
        Visible: Boolean(ThisRecord.Visible),
        Width: Value(ThisRecord.Width),
        Sortable: Boolean(ThisRecord.Sortable),
        Order:Value(ThisRecord.Order)

})
);
Clear(colEditView);

If(CountRows(colPersonalView) = 0,
    Collect(colEditView, colDefaultView),
    Collect(colEditView,colPersonalView)
);
The elements in the container:
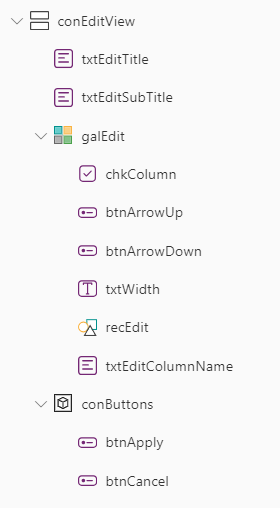
The OnSelect of the ArrowUp button (change -1 to +1 for the Arrow Down button)
Set(selectedItem, ThisItem);

// Find the item currently above the selected item
Set(itemAbove, LookUp(colEditView, Order = selectedItem.Order - 1));

// Swap Order values if there is an item above
If(
    !IsBlank(itemAbove),
    // Update the item above
    Patch(
        colEditView,
        itemAbove,
        { Order: selectedItem.Order }
    );

    // Update the selected item
    Patch(
        colEditView,
        selectedItem,
        { Order: selectedItem.Order - 1 }
    )
);
The OnChange for the txtWidth:
Patch(
    colEditView,
    LookUp(colEditView, ColumnID = ThisItem.ColumnID),
    { Width: Value(Self.Value) }
)
Apply or cancel

On the Apply button:
If(CountRows(colPersonalView) = 0,
// Create new item for user
    Patch('Personal views',
    Defaults('Personal views'),
    {
        Title: User().Email,
        Viewsettings: Text(JSON(colEditView))
    }),
// Update view for user
    Patch('Personal views',
    LookUp('Personal views', Title=User().Email),
    {
        Viewsettings: Text(JSON(colEditView))
    })
);

ClearCollect(colDisplayView, colEditView);
Clear(colEditView);
UpdateContext({varvisibleEditView: false });
On the Cancel button: This button makes it possibly for the user to cancel the change of the personal view.
Clear(colEditView);
UpdateContext({varvisibleEditView: false });
All these setup makes it possible to create a personal view per user!
Conclusion
In this setup a user can create one personal view, off course you can think of scenarios in which multiple view can be created and even view to share with all users.

